Face localization can be achieved with various techniques, such as Image-based techniques, Support Vector Machines, Neural Network or Hidden Markov Model.
This method is composed by two macro phases:
- Face Candidate Detection, this consists in looking for possible candidates regions in the image that may contain a face. This contains a number of sub-steps, that we’ll see in more details:
- Illumination Compensation
- Color Space Transformation (aka Segmentation or Color Clustering)
- Localization Based on Skin Model
- Localization of the Main Face Features
- Face Candidate Verification, consisting in verifiying if the candidate region actually contains a face.
Illumination Compensation
The skin-tone depends on the environment illumination, so we can normalize color appearance by using a “reference white”.
The reference white is calculated as following:
- We take the luma value for each pixel, luma is the sum of gamma-compressed RGB components and models the quantity of illumination in each pixel, obtained by transforming each pixel with a gamma parameter lower than 1. This new value is denoted as R’G’B’.
- We take the pixels with the top 5% of luma
- If a sufficient number of this pixels is found, this means that on average this colour is not similar to the skin tone, so we can scale every RGB component with respect to this value.
Color Space Transformation
It’s the process of simplify the representation of an image into something that’s more meaningful and easier to analyze. Every pixel is assigned with a label, meaning that pixels with the same label share some characteristics.
Localization Based on Skin Model
It’s based on Variance-based Segmentation and Identification of Connected Components
The simplest method for segmentation is called the thresholding method. This method consists in selecting a threshold value in order to transform the image into black and white, where white pixels belong to the face region, and black ones don’t. The threshold has to be within 0 to 255. Everything below is transformed into black and everything above it’s transformed into white.
Variance-based segmentation works like this:
Let be the image with gray levels and the size of . Let be the number of pixels with gray level .
We can represent the image as an histogram that represent the gray level distribution in the image. The histogram has on the axis the 255 bins and on the axis the . The histogram can be normalized in order to have an histogram comparable with images of different sizes by just dividing every by the size of the image ().
We can set a threshold that assigns every pixel with to class and every pixel with to class .
We then assume that every pixel contained in is part of the background and every pixel contained in is part of the face, or vice versa.
The aggregate probability of a class is defined as the sum of probability belonging to that class.
We then can compute some statistics measures:
- Mean gray level: this is calculated for both classes as the sum of the elements in the class divided by the cardinality of the class.
- Class variance: .
We can use this measures in order to calculate the best threshold, since we want to minimize the variance for and maximise it for . We can calculate this threshold by doing .
This threshold can be calculated with some examples and then it will remain like that once and for all.
After this, we can find the Connected Components, meaning a region with no holes. This means that inside a connected component we can reach any other pixel in the region without ever exiting from the region. This components represent the regions that may contain the face and we can obtain this with motphological operators such as erosion or dilatation.
How dilation work:
The dilation opeator takes in input two pieces of data:
- The binary image that has to be dilated as a set of euclidean coordinates;
- The structuring element, or kernel : an usually small set of coordinate points that determines the effect of dilation on the input image.
Let be the translation of so that its origin is at , the dilation of by is the set of all points such that .
This is equal to changing the point, that is the point of the image where the center of the kernel is located, with the logical OR between all the other image pixels that are inside the kernel.
How erosion works:
The erosion operator is the opposite of the dilation operator.
The erosion of by is the set of all points such that .
This is equal to changing the point, that is the point of the image where the center of the kernel is located, with the logical AND between all the other image pixels that are inside the kernel.
Localization of the Main Face Features
Eye Localization
We first calculate the Chrominance Map, taking into account that the region around the eyes is characterized by high values of the blue component (dark) and low values of the red component (less dark) , this because the concavity around the eye.
Where .
We then calculate the Luminance Map, taking into account that the eyes region contain both light and dark zones that can be highlighted by the erosion and dilatation operators.
Where defines the dilation opeator and the erosion operator.
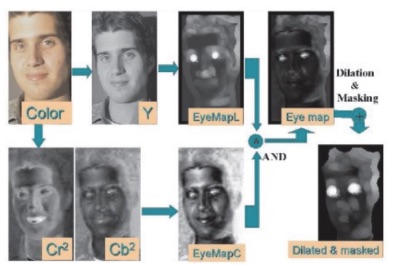
Eyes Detection flow
Mouth Localization
We can define the mouth region considering that the red component is higher than the blue component and that the ratio is low while is high.
Where
Face Contour
The face contour is calculated by analyzing all the triangles composed by two candidate eyes regions and a candidate mouth region. The geometry and orientation of this triangles id also checked.
A score is assigned to each triangles, and the triangles with the higher score is the one that should describe the face contour.